Showing posts with label DIY. Show all posts

Thursday, October 25, 2012

DIY Ombre Fishtail Friendship Bracelet Tutorial


I love friendship bracelets. They're one of the first crafty things that I ever learnt to make as a kid and they make me rather nostalgic. They're so easy to make and so fun to mix and match, I for one really appreciate the resurgence of the friendship bracelet trend!
The fab Mollie Makes magazine did an issue about friendship bracelets a while back and flicking through recently, I got a little inspired and decided to make up my own design and tutorial, so I present to you my Ombre Fishtail-Braid Friendship Bracelet! I say this every time I write a tutorial (which is rarely), but I'm fairly new at it, so apologies if large portions of this don't make a lot of sense! I've tried to include a couple of photos diagrams, so hopefully with the aid of both words and pictures, we'll muddle through!

Step 1: The first thing you will need is a bunch of thread, in varying degrees of your chosen colour. I'm using good old Anchor brand embroidery floss here, as there were so many colours to choose from. Going with an oceanic theme, I chose 6 graduated shades of blue/teal.

Step 2: I then measured out my threads. I measured about 50cm of each colour, and then cut the lengths in half, so I had two bunches of 25cm each. These measurements are really rough, but if you're unsure, definitely go longer than shorter, because there's nothing worse than getting to the very end of a bracelet and finding out that it's *just* too short and won't fasten! Arrrrgh!

I then tied the two bunches together at the top, and pulled them slightly separate, so half the colours were on one side and half on the other, as pictured below, ready to begin braiding.


Step 3: Start braiding! I love the look of fishtail braids in hair, and if you've never tried it before, head straight to youtube, because there are heaps of great tutorials to be found. I found it a little tricky to get the hang of at first, but I dare say it's a bit easier trying it with thread than in your own hair!
Basically the concept is super simple: you work with two bunches, and cross the back strand of each bunch over one another (and over the bunches), so that they meet in the middle and form the fishtail pattern.

I'm not sure if that makes any sense, so one more time using pictures and arrows! Take the back strand of bunch 1, cross it over bunch 1 so that it now becomes part of bunch two. Then, take the back strand of bunch 2, and cross it over bunch 2 so that it now becomes part of bunch 1, and the two strands cross in the middle.

Continue this until you've got a bracelet that fits around your wrist, leaving a trail of about 4cm on each end.


Step 4: Finish and fasten! It's really up to you how you'd like the finish and fasten your bracelet, but I decided to divide the left over 4cm tails in half and plait them, so there were two plaits on either end. You could simply tie these plaits together to fasten, but I decided to try something fancier and went to trusty old youtube and found this brilliant tutorial on how to create a macrame fasten that makes your bracelet adjustable! So neat!
(I tied my macrame knots in a different colour so they were easier to see. The ends just slide right through and fasten up again so easily, I'm really stoked with this trick!)


I also found these little shell and fish beads that I threaded and braided in.


So there we have it, an ombre, fishtail friendship bracelet! Apologies if parts of this didn't make sense, but I hope you like it, let me know if you try making it yourself!

homework

Tuesday, October 2, 2012

DIY Granny Square Necklace

The springy weather and sunshine were making me feel the need for some new, colourful accessories and I had plenty of bright shiny embroidery floss lying around, so I got out my crochet hook and made a good old granny!


I've got it on a long chain, because I am very much a fan of long chains to jazz up plainer tops. Any other long chain fans out there?


Tuesday, July 10, 2012

Sea Penny Blanket Update!

Quite a while back I posted about making a sea penny blanket, from Julia Crossland's tutorial. Little did I realise that my idea to make a blanket to cover about a third of a queen-sized bed was indeed foolish. 
It's going to take me fooooorever!
But as you can see, it's been slowly growing...
In fact, I think it's beginning to look a little like a sea creature. It's certainly very hairy, because I gave up on sewing the ends in as I went. 
I shall keep updating the progress! Has anyone else made anything out of sea pennies? Hopefully something much more sensible, like a scarf, or a shawl, because I know you are all far more sensible than I ;)

Sunday, July 8, 2012

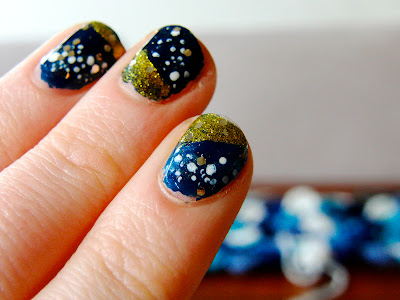
Gold Galaxy Nail Tutorial

Hello blog! I'm so sorry I've been neglecting you recently. I'm just struggling to find time between working endlessly and fitting in sleep and meals and other such things. And to make matters worse, my guest post went up on Yes, Teacher! yesterday! Which is in itself a very nice thing, and I have to thank Sarah for giving people the opportunity to contribute to her blog, and congratulate her on the birth of her baby boy William! However, it meant that a few more people visited my very neglected blog. Which again is a very nice thing, and super thanks to those who decided to follow along! However I feel kind of like I've had guests drop in and the house is a mess and I can't even offer them biscuits and tea. So my apologies! I'm desperately trying to get things cleaned up and back on track around here. So how about a quick nail tutorial? (alas, it's not even a very good nail tutorial. I'm falling apart at the seams here blog!)

So this is my attempt at a 'gold galaxy' manicure. There are plenty of galaxy nail tutorials out there that are far, far better than this one, but I mainly wanted to experiment with the gold. I'm not really happy with how the actual 'galaxy' part turned out, but it was my first attempt so I can definitely work at it more for next time. So maybe think of this more as ideas and inspiration than a proper tutorial!

I'm using a bunch of colours I picked up from Sportsgirl, which is what inspired to try this out in the first place. I mean, have you ever seen a gold so shiny?! So here we have Sportsgirl 'All That Glitters', 'Debut', 'Denim', a shimmery blue that I've had for years, and Sally Hansen 'White On'. I also used a make-up sponge and a skewer for dotting. 

 First off, I painted all my nails in two coats of dark blue and allowed them to try enough to put the tape on. 
I put the tape across at varying angles, and did two coats of gold. Fortunately this gold is pretty strong and showed up reasonably well over the blue, but I guess it might have been better to do blue over gold. But it always gets complicated and messy with tape manis!...which is probably because I'm super novice, but oh well.
 Next, I sponged a little of the shimmery, lighter blue in a wide, diagonal line across the nail, to add a bit of depth to the galaxy look. This is where I think I went wrong in achieving a really good galaxy look, as I was afraid the sponging was going to ruin it so I really held back. However, most of the tutorials I've seen really sponge a lot of lighter colour on there, so if I did it again, I'd certainly sponge more and maybe try and blend with the darker blue. 
 I then used the skewer to create 'stars' of various sizes...


 And finished off with a goat of 'All That Glitters'. Again, I think if I tried this again, I would use a coat of really fine gold glitter, as I think the dots of big glitter here compete with the stars. 
I must also apologise for the fact that by the time I had time/day light to properly photograph my nails, they'd chipped a little.


 So there we have it, a super novice, super messy manicure, that might hopefully give someone out there some inspiration. Let me know if it does!

Saturday, June 2, 2012

Where Are All My Crochet Hooks?! - DIY Crochet Hook Pouch

 I am forever losing my crochet hooks! It's really quite frustrating, but I have put it down to the fact that I have nowhere to keep them. I therefore decided to make a little pouch for them. 
It's super simple, pretty much a pencil case type thing, that you could keep anything in, really. I used this really helpful tutorial from over at Skip to My Lou (and modified it a little) to help me work out how to do the zip and lining. I'm an extremely novice sewer, so I'm just going to do a quick run down of what I did here, but for a more detailed version that might actually make sense, definitely check out the Skip to My Lou tutorial!


I picked these fabrics, the zigzags for the outside and diamonds for the lining from the wonderful selection I have collected from Patchwork on Central Park

I then cut four pieces of fabric (two for the outer, two for the lining), measuring approximately 23x11 cm. 

 You then need to sew the zip between the lining and outer, by sandwiching it in between two pieces, right sides facing each other, like so. 

 Pin these pieces together, sew it all up, and repeat, sewing the other two pieces to the other side of the zip.

 Once you've finished, you should be able to open it out into something that looks somewhat like this...


Then, lay both the outer pieces right side to right side, and both the lining pieces right side to right side, and sew around all the edges, leaving a gap of 7 or so centimetres so you can turn it out the right way when you're done. Make sure the zip's open before you sew, or you won't be able to turn it out!
 All sewn up!
 And voila, there we have it!
 Mine's actually not quite finished at this stage, as my zip wasn't long enough, so I ended up hand sewing the ends of the zip together. 
I hope some of that made sense! And I hope I will now be able to locate my crochet hooks, although I suppose that depends on whether I actually manage to put them back in the pouch after I've used them...this seems unlikely. 
 At the moment my pouch isn't very full and it's pretty wide, so I'm considering adding a little button, so it can fold in half. I will update if I do!


homework